Sunday, 20 December 2015

Software analysis using JQAssistant

Last week, I was playing a bit with a very interesting tool: JQAssistant. JQAssistant parses and analyses source files and loads them into a Neo4j graph database. By default, JQAssistant will analyze Java source code files, but JQAssistant is built using a plugin based architecture. So, there are various plugins available. For example, there are plugins to analyse Maven Files, XML Files or JUnit test results. Hopefully, there will also be other language plugins be added in the future. Especially, C++ would be nice!
So, why would you want to have your source code in a graph database? Because this gives you a very powerful way to analyze your source code! JQAssistant creates a graph database with nodes and relations such as:
  • TYPE declares METHOD
  • TYPE declares FIELD
  • TYPE extends TYPE
  • TYPE implements TYPE
  • METHOD invokes METHOD
  • METHOD throws METHOD
  • METHOD reads FIELD
  • METHOD writes FIELD
  • METHOD annotated_by METHOD
  • ...
Each of the nodes also has properties like full qualified name, visibility, md5 hash (of classes) or signature and cyclomatic complexity for methods. As you can see, a big graph with lot's of information is created. This graph can now be queried for certain properties using the powerful Neo4j language. Several examples that come to my mind are:
  • It can be used to ensure architecture guidelines, such as "frontend classes may only call service layer classes, but not backend classes".
  • Ensure naming guidelines, "e.g. all Service classes must end in *Service or *ServiceImpl and frontend classes in a certain package must only be *Model or *Controller".
  • All unit tests must call an Assert.* method - otherwise the test does not test anything.
  • What are the most complex methods in my code that are not called from unit tests?
  • Analyze properties of your source, e.g. number of classes, methods etc.

Important to note is that there is a Maven plugin to execute JQAssistant during builds. This allows you to run JQAssistant queries during the build and for example let's you fail the built if certain architecture guidelines are not met.
We are doing this for QualityCheck already, even though we have only implemented a very simple check so far. This checks verifies that all unit tests match our name pattern ".*(Test|Test_.*)". Here is the relevant JQAssistant configuration my-rules.xml.
<jqa:jqassistant-rules xmlns:jqa="http://www.buschmais.com/jqassistant/core/analysis/rules/schema/v1.0">

    <constraint id="my-rules:TestClassName">
        <requiresConcept refId="junit4:TestClass" />
        <description>All JUnit test classes must have a name with suffix "Test".</description>
        <cypher><![CDATA[
            MATCH
                (t:Junit4:Test:Class)
            WHERE NOT
                t.name =~ ".*(Test|Test_.*)"
            RETURN
                t AS InvalidTestClass
        ]]></cypher>
    </constraint>

    <group id="default">
        <includeConstraint refId="my-rules:TestClassName" />
    </group>

</jqa:jqassistant-rules>
JQAssistant is even more useful for applications using QualityCheck! For example, QualityCheck encourages you to use the methods from Check.*, such as Check.notNull in all public methods of your classes and annotate methods usings @ArgumentsChecked. So, you could use JQAssistant> to find methods, annotated with @ArgumentsChecked, but who do not call any Check.* methods:
--
-- Find all methods having @ArgumentsChecked but not calling Check.* methods
--
MATCH
 (checkType:Type),
 (type:Type)-[:DECLARES]->(method:Method)-[:ANNOTATED_BY]->()-[:OF_TYPE]->(checkAnnotationType:Type)
WHERE 
 checkType.fqn = 'net.sf.qualitycheck.Check' AND 
 method.visibility = 'public' AND
 checkAnnotationType.fqn='net.sf.qualitycheck.ArgumentsChecked' AND 
 NOT type.fqn =~ ".*(Test|Test_.*)" AND 
 NOT (method:Method)-[:INVOKES]->(:Method)<-[:DECLARES]-(checkType:Type)
RETURN
 method.signature AS Method, type.fqn as Type;
Additionally, the other way round should be checked, i.e. find all methods who call Check.* but that do not have the annotation.
--
-- Find methods calling Check.* but not having @ArgumentsChecked in all non-test classes
--
MATCH
 (checkType:Type)-[:DECLARES]->(checkMethod:Method),
 (type:Type)-[:DECLARES]->(method:Method)-[:INVOKES]->(checkMethod:Method),
 (checkAnnotationType:Type)
WHERE 
 checkType.fqn = 'net.sf.qualitycheck.Check' AND 
 method.visibility = 'public' AND
 checkAnnotationType.fqn='net.sf.qualitycheck.ArgumentsChecked' AND 
 NOT type.fqn =~ ".*(Test|Test_.*)" AND 
 NOT (method:Method)-[:ANNOTATED_BY]->()-[:OF_TYPE]->(checkAnnotationType:Type)
RETURN
 checkMethod.name AS CHECK_METHOD_CALLED, method.signature AS Method, type.fqn as Type;
As a software architect, you should now create a third rule, which indicates which methods must use check and must have the annotation, i.e. all public methods in classes call "*ServiceImpl".
I hope this was a small introduction and gave you a small impression of the power of this tool. I would be happy to get some feedback on this and also share some questions that arise for the future of this.
  • Is there C++ support planned? Is someone working on a C++ plugin to parse C++ code?
  • How does this perform with big systems? Does anyone have used this on a larger system?
  • Is there a Sonar Qube integration? Can I show failed checks as violations or in charts in Sonar?
  • What are your use cases and queries?

Thursday, 22 October 2015

Visualize dependencies of binaries and libraries on Linux

Update4: Albert Astals Cid mentioned that KDE maintains also a version of that script: draw_lib_dependencies

Update3: Marco Nelissen fixed an issue, that caused dependency resolution to break, as soon MAXDEPTH was reached once. This issue was fixed now and I am quite happy that this old script is still useful and even get's improved. The updated version can also be found at dependencies.sh. Version below fixed as well.

Update2: pfee made some more fixes. The script parses now the dependcies tree correctly using readelf and ldd so that only direct dependencies apear in the graph. The updated version can also be found at dependencies.sh


Update: Thanks to the feedback from pfee, I made some fixes to the script. The script is now also available for direct download dependencies.sh


Sometimes it is useful to know the library dependencies of an application or a library on Linux (or Unix). Especially OpenSource applications depend on lot's of libraries which in turn depend on other libraries again. So it is not always quite clear which dependencies your software has.


Imagine you want to package up your software for a customer and need to know on which libraries your software depends. Usually you know which libraries were used during development, but what are the dependencies of these libraries? You have to package all dependencies so that the customer can use and/or install your software.


I created a bash-script which uses ldd to find the dependencies of a binary on Linux and Graphviz to create a dependency graph out of this information. Benedikt Hauptmann had the idea to show dependencies as a graph - so I cannot take credits for that. Using this script I created the depency graph of TFORMer, the report generator we are developing at TEC-IT. The result is a nice graph showing all the dependencies a user has to have installed before using TFORMer.


Another beautiful graph is the one of PoDoFo. See below the graph of PoDoFo.


The dependencies of Firefox are way more complex than the examples shown above...


If you want to create a graph of your favorite application or library your self, get the script from here. I pulished the simple source code below. Graphviz is the only requirement. Usage is very simple, just pass an application or library as first parameter and the output image as second argument. The script will always create a PNG image:
./dependencies.sh /usr/bin/emacs emacs.png
./dependencies.sh /usr/local/lib/libpodofo.so \
                  podofo.png


The code of the script is as follows: (Warning: the style sheet cuts of some lines, so better download the script from dependencies.sh)


#!/bin/bash
 
# This is the maximum depth to which dependencies are resolved
MAXDEPTH=14
 
# analyze a given file on its
# dependecies using ldd and write
# the results to a given temporary file
#
# Usage: analyze [OUTPUTFILE] [INPUTFILE]
function analyze
{
    local OUT=$1
    local IN=$2
    local NAME=$(basename $IN)
 
    for i in $LIST
    do
        if [ "$i" == "$NAME" ];
        then
            # This file was already parsed
            return
        fi
    done
    # Put the file in the list of all files
    LIST="$LIST $NAME"
 
    DEPTH=$[$DEPTH + 1]
    if [ $DEPTH -ge $MAXDEPTH ];
        then
        echo "MAXDEPTH of $MAXDEPTH reached at file $IN."
        echo "Continuing with next file..."
 # Fix by Marco Nelissen for the case that MAXDEPTH was reached
 DEPTH=$[$DEPTH - 1]
        return
    fi
 
    echo "Parsing file:              $IN"
 
    $READELF $IN &> $READELFTMPFILE
    ELFRET=$?
 
    if [ $ELFRET != 0 ];
        then
        echo "ERROR: ELF reader returned error code $RET"
        echo "ERROR:"
        cat $TMPFILE
        echo "Aborting..."
        rm $TMPFILE
        rm $READELFTMPFILE
        rm $LDDTMPFILE
        exit 1
    fi
 
    DEPENDENCIES=$(cat $READELFTMPFILE | grep NEEDED | awk '{if (substr($NF,1,1) == "[") print substr($NF, 2, length($NF) - 2); else print $NF}')
 
    for DEP in $DEPENDENCIES;
    do
        if [ -n "$DEP" ];
        then
 
            ldd $IN &> $LDDTMPFILE
            LDDRET=$?
 
            if [ $LDDRET != 0 ];
                then
                echo "ERROR: ldd returned error code $RET"
                echo "ERROR:"
                cat $TMPFILE
                echo "Aborting..."
                rm $TMPFILE
                rm $READELFTMPFILE
                rm $LDDTMPFILE
                exit 1
            fi
 
            DEPPATH=$(grep $DEP $LDDTMPFILE | awk '{print $3}')
            if [ -n "$DEPPATH" ];
            then
                echo -e "  \"$NAME\" -> \"$DEP\";" >> $OUT
                analyze $OUT $DEPPATH
            fi
        fi
    done
 
    DEPTH=$[$DEPTH - 1]
}
 ########################################
# main                                 #
########################################
 if [ $# != 2 ];
    then
    echo "Usage:"
    echo "  $0 [filename] [outputimage]"
    echo ""
    echo "This tools analyses a shared library or an executable"
    echo "and generates a dependency graph as an image."
    echo ""
    echo "GraphViz must be installed for this tool to work."
    echo ""
    exit 1
fi
 DEPTH=0
INPUT=$1
OUTPUT=$2
TMPFILE=$(mktemp -t)
LDDTMPFILE=$(mktemp -t)
READELFTMPFILE=$(mktemp -t)
LIST=""
 if [ ! -e $INPUT ];
    then
    echo "ERROR: File not found: $INPUT"
    echo "Aborting..."
    exit 2
fi
 # Use either readelf or dump
# Linux has readelf, Solaris has dump
READELF=$(type readelf 2> /dev/null)
if [ $? != 0 ]; then
  READELF=$(type dump 2> /dev/null)
  if [ $? != 0 ]; then
    echo Unable to find ELF reader
    exit 1
  fi
  READELF="dump -Lv"
else
  READELF="readelf -d"
fi


echo "Analyzing dependencies of: $INPUT"
echo "Creating output as:        $OUTPUT"
echo ""
 
echo "digraph DependencyTree {" > $TMPFILE
echo "  \"$(basename $INPUT)\" [shape=box];" >> $TMPFILE
analyze $TMPFILE "$INPUT"
echo "}" >> $TMPFILE
 #cat $TMPFILE # output generated dotfile for debugging purposses
dot -Tpng $TMPFILE -o$OUTPUT
 
rm $LDDTMPFILE
rm $TMPFILE
 exit 0

Monday, 5 August 2013

Java: Test Coverage for Private Constructors

It is good practice to add private constructors to utility classes that are not thought to be instantiated. This is usually the case for final classes that only have static methods or provide constants (in the latter case I would suggest to use an interface).

Following this practice usually gives a bad surprise when looking at your Cobertura code-coverage report (or similar). The tool reports that the constructor is not covered - of course, because you cannot call it! This lowers your overall percentage for line-coverage and is a drawback when you otherwise try to achieve 100% line-coverage and also enforce this using mvn verify or similar methods.


Quality-Check contains a module called Quality-Test in its newest snapshot release. It includes a small utility class CoverageForPrivateConstructor which allows us to write a little JUnit-Test to provide line-coverage for the private constructor.

@Test
public void giveMeCoverageForMyPrivateConstructor() throws Exception {
 CoverageForPrivateConstructor.giveMeCoverage(StaticCheck.class);
}


This result in a code-coverage report with full test coverage also for the private constructor. Nice, isn't it?

Quality-Test and Blueprint

Quality-Check and Quality-Test version 1.3 have been released. As a major addtion, Quality-Test includes a new module for test-data generation called "Blueprint".

A complete introduction into the Blueprint module will be given here in a later post. For now, two small examples will show, how easy it is to construct objects (i.e. blueprint objects) for your unit-tests. We use the class description and a configuration as a blueprint to construct an actual object, which is ready to be used in the test-case.

final NameDTO name = Blueprint.random().with("gender", Gender.Male).construct(NameDTO.class); 

final Address address = Blueprint.def().with(String.class, "Default").with("zipCode", 12345L).construct(Address.class);

As you can see, Blueprint contains two default configurations, which either fill all attributes using default or random values. Basically, Blueprint will walk the object tree and fill all attributes with default values specified by the current configuration. Therefore, you won't get any NullPointerExceptions in your test-cases, as all attributes are filled with values. You have to define only those values on which your functional test-case actually depends. Everything else is handled by blueprint.

If you have questions regarding Blueprint, drop me a mail. A more lengthy introduction will follow soon. So far, best is you simply try it out.

Monday, 4 March 2013

Building Static PoDoFo 0.9.1 with MSVC 2012

Just found this nice article about building PoDoFo using Visual Studio: http://johnbugbee.com/2012/12/30/building-static-podofo-0-9-1-with-msvc-2012/.

As this is a frequently asked question, I though I post it here. It might be of use to some of you. Please note, so, PoDoFo as of 0.9.2 has a dependency on OpenSSL which is not mentioned in the article as it focuses on 0.9.1. We are currently discussing about replacing OpenSSL in favour of LibCrypto++.

Saturday, 23 February 2013

PoDoFo 0.9.2 Bug-Fix Release Available

PoDoFo 0.9.2 has been released today and is available for download at our download section. This release collects many bug fixes which were made over the last two years. The biggest addition is the new encryption support based on OpenSSL. Please note that OpenSSL is now a mandatory requirement.

Get downloads from podofo.sf.net

Saturday, 15 December 2012

KBarcode-kde4 port ready and released

KBarcode has been ported to KDE4/Qt4 by Fanda. Also some of the older bugs related to GUI have been fixed. It seems stable. The new version of KBarcode for KDE4/Qt4 has been renamed to KBarcode-kde4 so that users can have the old KBarcode for KDE3/Qt3 as well as the new KBarcode for KDE4/Qt4 installed on one system.

KBarcode-kde4 uses Akonadi. KCommand and related stuff has been ported to QUndoCommand and so on ... Spellchecking was ported to Sonnet but the new implementation of Sonnet in KBarcode-kde4 is odd and complicated so it will be deprecated and replaced in a future version.

KBarcode-kde4 is currently in a beta stage. It is not in Ubuntu or Debian repositories yet. At the moment (2012-12-14) only a deb package for amd64 architecture exists. Download the deb package kbarcode-kde4_3.0.0b2-1_amd64.deb from https://sourceforge.net/projects/kbarcode/files/Development/3.0.0b2/kbarcode-kde4_3.0.0b2-1_amd64.deb and follow instructions in https://sourceforge.net/projects/kbarcode/files/Development/3.0.0b2/README-INSTALL.txt to install it.

The source code can be found in the source tarball at http://sourceforge.net/projects/kbarcode/files/Development/3.0.0b2/kbarcode-kde4_3.0.0b2.tar.gz/download or in the GIT repository at https://gitorious.org/kbarcode-kde4/kbarcode-kde4/commits/master.

Thank you very much for your work Fanda!

Wednesday, 12 September 2012

Quality-Check 0.10 released

We releases Quality-Check 0.10 today! The new release includes several new checks such as:
  • Check.instanceOf
  • Check.isNumber
  • Check.isNumeric
  • Check.notNaN

Most importantly you should check-out our enhanced webpage and especially our comparison, where we compare Check with other classes like org.springframework.util.Assert [1] or com.google.common.base.Preconditions [2] or org.apache.commons.lang3.Validate [3].

Wednesday, 5 September 2012

Quality-Check for Java

André Rouél and I startet a new OpenSource project to avoid technical errors in Java applications: Quality-Check.

The goal of quality-check is to provide a small Java library for basic runtime code quality checks. It provides similar features to org.springframework.util.Assert or com.google.common.base.Preconditions without the need to include big libraries or frameworks such as Spring or Guava. 
The package quality-check tries to replace these libraries and provide all the basic code quality checks.

Example


/**
 * Sets the given object if it is not null.
 * 
 * @throws IllegalArgumentException
 *         if the given argument is {@code null}
 */
public void setObject(final Object object) {
    if (object != null) {
        throw new IllegalArgumentException("Argument 'object' must not be null.");
    }
    this.object = object;
}


can be replaces by:

/**
 * Sets the given object if it is not null.
 */
@ArgumentsChecked
public void setObject(final Object object) {
    this.object = Check.notNull(object);
}

It is now available in Maven Central so adding it to your project is as simple as putting these five lines into your pom.xml:
<dependency>
<groupid>net.sf.qualitycheck</groupid>
<artifactid>quality-check</artifactid>
<version>0.9</version>
</dependency>

Please take also a look at our webpage or our project at GitHub.

Sunday, 15 July 2012

PoDoFoColor Lua Scripting


sdaau wrote in with some news about podofocolor, I'd like to share:

I just found about podofocolor on http://domseichter.blogspot.dk/2011/01/modifying-and-analyzing-colors-in-pdf.html - and I got really interested in "Analyzing colors - Find out, which colorspaces or colors are used in a PDF". I couldn't find an example of how to do that on that page, and I assumed the only way to do is through Lua.

Unfortunately, while there are some PPA builds for Ubuntu ( see http://sdaaubckp.svn.sf.net/viewvc/sdaaubckp/offext-call-scripts/podofo.sh ), those do not have Lua built-in, so I rebuilt podofo and utils on Lucid, and posted the executables here - since they are statically linked, they may be useful to others as well:

http://sdaaubckp.sourceforge.net/post/libpodofo-utils-lucid/

I have also recorded the steps to building those executables in http://sdaaubckp.svn.sf.net/viewvc/sdaaubckp/source-build-scripts/get-podofo-src.sh

The above directory also contains a modification of the example.lua script:

http://sdaaubckp.sourceforge.net/post/libpodofo-utils-lucid/example-colorlist.lua

... which can be used to simply print out any color encountered in a PDF, by using this command line:

$ ./libpodofo-utils-lucid/podofocolor lua example-colorlist.lua /path/to/mytest.pdf /dev/null

<]/Info 2 0 R/Root 1 0 R/Size 16>>
Processing page 1...
-> Lua is parsing page: 1
Reading object 6 0 R with type: Number
set_non_stroking_color_gray: 1
set_non_stroking_color_cmyk: 0.233887 1 1 0.218994
....

Note that it is important to add `/dev/null` as output file - otherwise, both the color report _and the pdf in its entirety_ will be dumped to the terminal - making the report about colors impossible to read.

I would have appreciated a lot a similar guide/explanation on the blogspot webpage (or in a help/readme); and I'd be very happy if some of this here can contribute towards more detailed examples in then documentation.

Many thanks for the great software,
Cheers!  


The original post can be found here: http://sourceforge.net/tracker/?func=detail&aid=3539970&group_id=154028&atid=790133
If you also have interesting PoDoFo stuff to share, feel free to drop me a mail.

KBarcode KDE4 Port Status Update

Fanda provided some updates on the status of the KBarcode-KDE4 port:

The version tagged as "port-1.0" on gitorious.org/kbarcode-kde4 works and has the most of the Kbarcode's functionality except a database support. It compiles succesfully with few compile warnings and uses all of the Kbarcode's source files except gnubarkodeengine.cpp and gnubarkodeengine.h . But it still uses QT3 support classes like Q3Canvas, Q3SqlCursor, Q3DataTable, Q3SimpleRichText, etc. I am currently working on porting the QT3 support classes to pure QT4. I have already ported Q3Canvas and related stuff to QGraphicsScene (which proved to be the most difficult porting) but I haven't pushed it to the online repository on gitorious.org/kbarcode-kde4 yet.
I am so glad to this project to be continued! It looks much prettier than the KDE3 version and even did import my old KBarcode3 label files without any problems.

Want some screenshots? Here you got.


Sunday, 6 February 2011

Directory Management with KRename

Yesterday, I got a very interesting e-mail from Todd about using KRename. His request required one new feature which was added to KRename SVN and makes KRename even more powerful. So, I think his usecase is interesting enough to be shown here.

First of all, he has several files which he wants to sort into different directories based on parts of their names. If the filename contains the word "essay" it is supposed to go into a subdirectory called "essay/" and the same should be done for the memo's. His example list of files looks like this:


Work Essay for fred.txt
Work Essay for bob.odt
Work Essay for alice.doc
Work Memo for mary.odt
Work Memo for ben.txt
Work Memo for carey.doc


At the end, we want a directory and file structure like this:

Essay/Work Essay for fred.txt
Essay/Work Essay for bob.odt
Essay/Work Essay for alice.doc
Memo/Work Memo for mary.odt
Memo/Work Memo for ben.txt
Memo/Work Memo for carey.doc


You can create directories in KRename during renaming of files using the [dirsep] operator or by simply using a / (slash) in the template. So, the template newdir[dirsep]$ will create a new directory called newdir and move all files to this directory. The token $ is KRename' way of saying, "insert the original filename here".

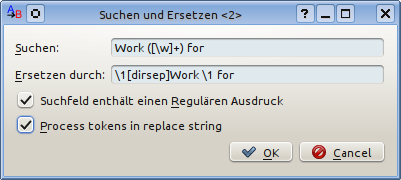
Now, one can combine this feature with the powerful regular expressions. Just go to the "Search and Replace ..." dialog and enter the regular expression Work ([\w]+) for and replace it with \1[direp]Work \1 for. The backreference \1 inserts a matched string from the regular expression into the results. Thereby, we can include either "memo" or "essay" in the new directory name. The matched part is indicated by brackets in the regular expression.

To make this work, one new feature was added to KRename. The dialog contains a new checkbox which allows to enable processing of KRename tokens in the replacement string of find and replace. We need this feature to process the [dirsep] token correctly and create a new directory
See the screenshots below.


If you have similar interesting usecases for KRename or questions on how to do thinks, do not hesitate to write a mail to our mailinglist!

Sunday, 30 January 2011

Modifying and analyzing colors in PDF files using podofocolor

What is podofocolor?


Podofocolor is the newest addition to the podofo-tools package. It is a command-line tool to analyze and/or modify all colors in a PDF file. This can be done using predefined rules or based on a custom Lua script.

Basically, podofocolor opens a PDF file and goes through every page or vector graphics object (e.g. an XObject) and looks at every PDF command. Whenever it encounters a colorspace definition or a PDF command, which sets a color for a following PDF operation like “draw a line” or “fill area with color”, an action can be performed. These actions are either predefined actions or can be defined by implementing a C++ interface or more likely by providing a Lua script. Predefined actions are “convert this color to grayspace” or “print color name to stdout”; however more complicated actions can be easily created as well. As can be seen by the “grayscale”-action, the most powerful feature of the tool is to replace colors in a PDF file. Custom color conversion algorithms can be implemented in Lua and be immediately applied to any PDF file.

How is it useful?


There are different use-cases for such a tool and I assume users will come up with even more options. Possible usage scenarios that come to my mind can be categorized in two areas: analyzing colors and modifying colors.

  • Analyzing colors

    • Find out, which colorspaces or colors are used in a PDF

    • Verify that certain colors are not used in a PDF

    • Verify that only CMYK or ICC-based colors are used in a PDF


  • Modifying colors

    • Convert colorspace of a PDF (e.g. convert it to grayscale or CMYK)

    • Convert colors in a PDF to certain corporate colors

    • Split one PDF file into four different PDF files, where each file represents one component of the CMYK colors used in the PDF. As a result, you will receive one PDF containing only the cyan color channel, one containing the yellow one, etc..


Usage


The usage of the command-line tools is simple:

./podofocolor [converter] input.pdf output.pdf

Different values are possible to be used as a converter. The table below lists all converters which are currently available:


Converter   Description
dummy   This is an example implementation of a converter in C++, which will convert all colors in a PDF to RGB red.
grayscale   The grayscale converter changes all colors to its grayscale equivalents in a grayscale colorspace.
lua planfile   The Lua converter is the most powerful one. It takes a lua file as another parameter. This Lua file provides the color conversion descriptions implemented as Lua functions.

For example, to convert the colors in a PDF file using the included example.lua file, you would use the following command:

./podofocolor lua example.lua input.pdf output.pdf


Writing own converters


For the tool to be really useful, you will have to create your own converter. This can either be done by implementing the C++ interface IConverter or by creating a small and simple Lua script. If you consider creating a C++ implementation of the interface, the included Doxygen comments will be enough to get you started (Yes, it is that simple! For example, the grayscale converter consists of only 44 lines of source code and most other conversions will be the same size), so we will skip the C++ part and go straight to Lua.

Lua is a very simple, yet powerful, scripting language. To get started, it is best to download the example.lua file included in PoDoFo. It contains all the necessary function definitions, which you can adapt to your needs.

We will start with a short example: whenever podofocolor finds a definition of a stroking color on a PDF page (i.e. a color which is used when drawing lines or curves), it will call one function in the Lua script. The function called depends on the colorspace of the color definition. Currently, there are three different functions that can be called. set_stroking_color_gray will be called when a grayscale color is defined. Similarly, set_stroking_color_rgb or set_stroking_cmyk are called.
The example below shows an implementation of set_stroking_color_rgb with a rather simple implementation. The function gets the three parameters r, g, and b, which refer to the values of the red, green, and blue color components. The values are in the range of 0.0 to 1.0 as it is common in PDF files, where (0.0, 0.0, 0.0) is black and (1.0, 0.0, 0.0) is red. Now to the concrete function implementation: It checks if the passed color is black, if yes it returns a tuple with four values – which is a CMYK color – and thereby converts any occurrence of RGB black to CMYK black. For all other color values a tuple with three values is returned and the RGB color is not changed. Another option would have been to return a tuple with a single value and thereby convert the color to a gray value.


function set_stroking_color_rgb (r,g,b)
-- convert all black rgb values to cmyk,
-- leave other as they are
if r == 0 and
g == 0 and
b == 0 then
return { 0.0, 0.0, 0.0, 1.0 }
else
return { r,g,b }
end
end


Other functions in the script provide information about pages, objects, etc...

Limitations


Currently this tool does not convert images embedded in the PDF file. First of all, the focus of the tools is on modifying colors in PDF files and secondly, there are other tools, which can modify colors in images and/or work with images embedded in PDF files. If there is demand for such a feature, it can be easily added. Podofoimgextract, another PoDoFo-tool, is a good example of how easy it is to work with images using the PoDoFo API.

Download


Podofocolor is currently available in SVN trunk. Instructions on how to get and build PoDoFo trunk can be found on our website. It works on all supported platforms, including Windows and Unix systems. We are interested in your feedback! Feel free to drop a mail containing your feedback, comments, or suggestions to our mailing-list podofo-users@lists.sourceforge.net.

Wednesday, 15 September 2010

New sort modes in KRename

An often requested feature in KRename was to have more possibilities to sort the files before renaming. This was indeed a major limitation, as it is often eligible to sort files by date or some other criteria.

Some time ago, I found finally time to add sorting by date and today I finished a new powerful custom sorting feature, which allows to use any token to be used for sorting, which is supported by one of the plugins provided by KRename. This means sorting is now possible by almost any criteria, like [filesize], [creationdate], [user] or even [##tagTrack]. Of course, you can choose whether you want to sort ascending, descending or by numbers.

The screenshot below shows the new selection of sorting options in KRename.


If you click on "Custom...", you get a dialog like the one below, to specify what sorting criteria you want to use.


The final result might look like this, see the screenshot of Dolphin as a proof that we really sort by [filesize]:


This feature is currently only available in KRename SVN trunk. Still, I would be interested in your feedback.

Tuesday, 17 August 2010

KBarcode4-light released

Where is KBarcode for KDE4? Well, there are porting efforts under way in SVN, but these are sadly far from completion.

If you just want to create barcodes easily and save them as image or a PDF, rescue might be near in the form of KBarcode4-light. KBarcode4-light is a simple barcode generator for KDE4. It supports many 1D and 2D barcode formats and can export them as images or PDF files.

It is similar to KBarcode for KDE3, but less powerful. KBarcode4-light allows only to create single barcodes. As the port for KBarcode is not yet ready and no one knows when it will be ready, KBarcode4-light provides basic barcode generation for KDE. An additional benefit is that it provides an easy to use interface for Barcode Writer in Pure Postscript.


It is written in Python using the amazing PyQt4 Qt bindings and based on Barcode Writer in Pure Postscript by Terry Burton.

KBarcode4-light downloads are available. It requires Python and PyQt bindings for Qt4, as well as Ghostscript in your PATH. Please submit any feedback to the KBarcode mailing list.

UPDATE: Due to a small bug, a new fixed version 0.2 is available for downloads.

Saturday, 7 August 2010

podofocrop: PDF cropping in 10 lines of code

The PoDoFo tools family got a new member during the last week: podofocrop. This little tool crops the white margins of pages in PDF files.

I use tools like these a lot, for example when writing scientific papers or the like, because I try to include all figures as PDF files to have better quality in the final PDF. To do so, it is often necessary to remove the margin around the figure before including it. This is exactly what podofocrop is doing.

The figure below illustrates what podofocrop is doing. Figure (a) shows the input PDF file, we can see a page with a little bit of text and a big white margin. In the next step, Figure (b), podofocrop calculates the bounding box for the final PDF, i.e. the area on the page that has content and the size to which we want to crop the PDF. Ghostscript is used for this step and has to be in your PATH. Finally, the PDF is cropped and the new page is much smaller without any disturbing margins.


If you are interested, get podofocrop from the PoDoFo SVN. In case of questions, please contact the mailing list.

Please note: Windows support is still experimental and untested so far. It will compile but there are no guarantees that it will work. Help with the Windows port would be greatly appreciated.

At the end, let we give you one little detail on the implementation, because it is so amazingly simple using PoDoFo. If you remove the code for parsing command line arguments, communication with Ghostscript and error handling, you see that the tool has only a few lines:


std::vector cropBoxes = get_crop_boxes_from_gs( pszInput );
PdfVariant var;
PdfMemDocument doc;
doc.Load( pszInput );

for( int i=0;i {
PdfPage* pPage = doc.GetPage( i );
cropBoxes[i].ToVariant( var );
pPage->GetObject()->GetDictionary().AddKey( PdfName("MediaBox"), var );
}

doc.Write( pszOutput );

Wednesday, 21 July 2010

Saturday, 29 May 2010

Organising publications using KRename

I have to work with lot's of scientific publications at the moment. That means, I have a large directory with many PDFs that are related to my work. Sometimes, it is cumbersome to find the right PDF or publication to look something up. Of course, I could rename every PDF after I downloaded it by hand, but - you might guess it - I am to lazy for this.

But help is in sight! I added a plugin to KRename, which can rename files based on meta-data included in PDF files. Organising a large set of publications is now a matter of adding the PDF files to KRename and using the template "[pdfAuthor] - [pdfTitle]". Convenient, isn't it? The screenshot below shows KRename while renaming a few PDF files.


The supported tags are [pdfPages] (number of pages), [pdfProducer], [pdfTitle], [pdfSubject], [pdfKeyword], [pdfCreator] and, [pdfAuthor]. If you have an idea for further meta-tags, do not hesitate to contact me. It should be quite easy to add more information, the current implementation is a matter of 10 lines thanks to the PoDoFo library used.


A pity is that many PDF authors do not add proper meta-data to their PDF files. So, if you are writing on a publication at the moment, please make sure you add your information to the PDF metatags.

This feature is currently only available in KRename SVN trunk.

Thursday, 29 April 2010

PoDoFo Base 14 Font support

Today has seen a major contribution to the PoDoFo PDF library.

I integrated a patch by Ian Curington and his developers, which brings support for using the base 14 fonts in PDF files. What are the base 14 fonts, you might ask?

Every PDF viewer has to ship with these 14 fonts, therefore one can achieve much smaller file sizes, as these particular 14 fonts do not have to be embedded into the PDF. Still, the PDF is displayed the same on every system (should be displayed ...), as every PDF viewer has the same font metrics for these fonts. Among the base 14 fonts are Helvetica, Times, Courier and Symbol.

This contribution makes the base 14 fonts available to everyone creating PDFs using PoDoFo. As the base 14 fonts are automatically used, whenever you request a PdfFont like Helvetica, this should result in much smaller file sizes for PDFs created with PoDoFo, which only use these fonts. An example which does also compare one of the base 14 fonts (Helvetica) to a TrueType font (Arial) is also provided. Okular has some problem displaying the symbol fonts, which I have yet to investigate.

If you would like to try the change, please grab the latest PoDoFo from SVN. The change is not included in the latest 0.8.0 release.

Tuesday, 6 April 2010

A web-radio plasmoid for your desktop

Since I am in Limerick, Ireland, I started to listen quite a lot to RTÉ 2XM, which is a great web-radio station of the public broadcasting service in Ireland (Click for webstream).

RTÉ has a quite nice applet for the Windows Vista or Windows 7 sidebar. Unfortunately, the do not yet offer one for KDE and Plasma. Instead of waiting for the applet, I wrote a little web-radio applet by myself yesterday.


The plamoid has a simple list of radio stations and a play and a stop button. Easy, isn't it? Of course you can configure the list of stations. If you download and install it, it comes preconfigured with all the RTÉ stations and my favourite Austrian station FM4.


You can download the plasmoid from here: http://krename.sourceforge.net/data/plasmaradio-0.1.tar.gz.

To install the plasmoid, follow the following steps after downloading it:

tar xvfz plasmaradio-0.1.tar.gz
cd plasmaradio-0.1
mkdir build
cd build
cmake -DCMAKE_INSTALL_PREFIX=$KDEDIRS ..
make
make install


I would be happy to receive some feedback on this little piece of code. By the way, I think it really shows what great stuff can be done in so little time using the KDE4 API.